自定义 spring-boot-starter
spring-boot-starter 的作用
xxx-spring-boot-starter 本质上也是一个 Spring 项目。将其作为一个 pom 依赖引入后,当前项目中可以直接使用在 xxx-spring-boot-starter 项目里面配置好的设置,达到一个配置重用的效果,即自动配置。下面以自定义的一个 hello-spring-boot-starter 为例,分别介绍如何使用和如何创建这样的一个 starter。
spring-boot-starter 的使用
hello-spring-boot-starter 是自定义的一个 springboot 项目,没有主启动类,也不需要主启动类。其功能是读取配置文件的值,利用这些值配置一个 HelloService 对象,从而达到其它项目在引入 hello-spring-boot-starter的 pom 依赖后可以直接利用 @Autowired 使用该 HelloService 对象。
引入 pom 依赖
        <!--hello-spring-boot-starter是自定义的一个springboot项目-->
        <dependency>
            <groupId>org.example</groupId>
            <artifactId>hello-spring-boot-starter</artifactId>
            <version>1.0</version>
        </dependency>
配置文件(可以省略,不省略则表示覆盖默认值)
# 覆盖设置的默认值(root和root)
hello:
    username: admin
    password: admin
在
@SpringBootTest中使用HelloService对象import com.example.service.HelloService; import org.junit.jupiter.api.Test; import org.springframework.beans.factory.annotation.Autowired; import org.springframework.boot.test.context.SpringBootTest; @SpringBootTest class HeimaSecurityApplicationTests { @Autowired private HelloService helloService; @Test public void getHelloSpringBootStarterTest(){ System.out.println(helloService); } }
spring-boot-starter 的创建
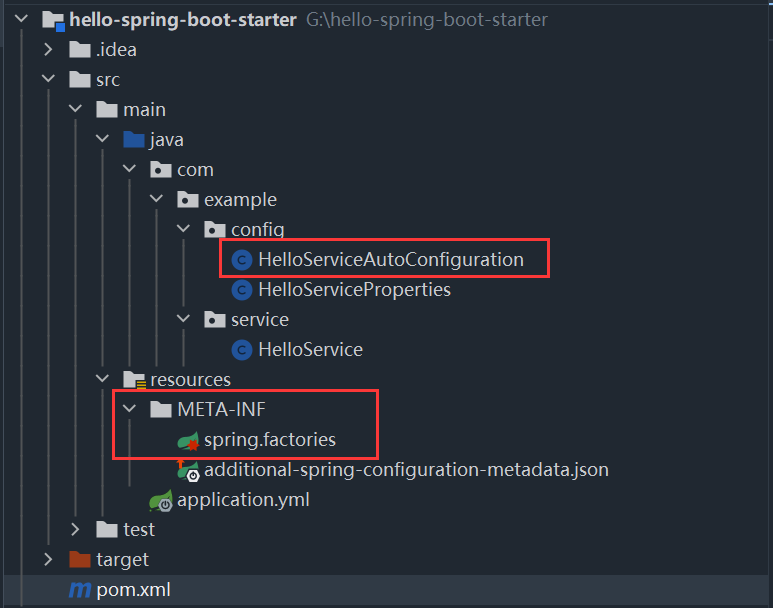
hello-spring-boot-starter 项目的结构
HelloServiceAutoConfiguration:(自动)配置类HelloServiceProperties:配置文件读取类HelloService:(自动)配置的目标类META-INF/spring.factories:在引入 hello-spring-boot-starter 的其它 SpringBoot 项目中,会扫描该文件路径来获取自动配置类(Spring自动配置源码硬编码)
pom 文件
<?xml version="1.0" encoding="UTF-8"?>
<project xmlns="http://maven.apache.org/POM/4.0.0"
         xmlns:xsi="http://www.w3.org/2001/XMLSchema-instance"
         xsi:schemaLocation="http://maven.apache.org/POM/4.0.0 http://maven.apache.org/xsd/maven-4.0.0.xsd">
    <modelVersion>4.0.0</modelVersion>
    <!--引入spring-boot-starter-parent来进行版本管理, 减少需要手动管理的依赖-->
    <parent>
        <groupId>org.springframework.boot</groupId>
        <artifactId>spring-boot-starter-parent</artifactId>
        <version>2.2.2.RELEASE</version>
    </parent>

    <!--本项目的相关信息-->
    <groupId>org.example</groupId>
    <artifactId>hello-spring-boot-starter</artifactId>
    <version>1.0</version>

    <properties>
        <maven.compiler.source>8</maven.compiler.source>
        <maven.compiler.target>8</maven.compiler.target>
    </properties>

    <dependencies>
        <dependency>
            <groupId>org.springframework.boot</groupId>
            <artifactId>spring-boot-configuration-processor</artifactId>
            <optional>true</optional>
        </dependency>
        <dependency>
            <groupId>org.projectlombok</groupId>
            <artifactId>lombok</artifactId>
        </dependency>

        <!--xxx-spring-boot-starter项目的核心依赖, 其它的都是次要的-->
        <dependency>
            <groupId>org.springframework.boot</groupId>
            <artifactId>spring-boot-starter</artifactId>
        </dependency>
    </dependencies>
</project>
HelloService 自动配置的目标类(可以不是 hello-spring-boot-starter 项目中的类,或者说往往不是,这里为了简化问题的处理)
public class HelloService {
    private String username;
    private String password;

    public HelloService() {
    }

    public HelloService(String username, String password) {
        this.username = username;
        this.password = password;
    }

    @Override
    public String toString() {
        return "Hello{" +
                "username='" + username + '\'' +
                ", password='" + password + '\'' +
                '}';
    }
}
HelloServiceAutoConfiguration 自动配置类
自动配置是相对于使用 hello-spring-boot-starter 作为其 pom 依赖的 SpringBoot 项目而言的,在 hello-spring-boot-starter 项目本身中,所谓的自动配置类就是一个配置类。(对于 hello-spring-boot-starter 项目的维护者来说,这是手动配置类,我配置好了,别人再去使用就是自动配置了)
import com.example.service.HelloService;
import org.springframework.beans.factory.annotation.Autowired;
import org.springframework.boot.autoconfigure.condition.ConditionalOnMissingBean;
import org.springframework.boot.context.properties.EnableConfigurationProperties;
import org.springframework.context.annotation.Bean;
import org.springframework.context.annotation.Configuration;

/**
 * 自动配置类, 用于自动配置HelloService
 */
@Configuration
@EnableConfigurationProperties(HelloServiceProperties.class)
public class HelloServiceAutoConfiguration {

    @Autowired
    private HelloServiceProperties helloServiceProperties;

    // // 另外一种注入方式
    // public HelloServiceAutoConfiguration(HelloServiceProperties helloServiceProperties) {
    //     this.helloServiceProperties = helloServiceProperties;
    // }

    /**
     * 添加 @Bean 注解才会自动调用该方法
     * <p>
     * 添加 @ConditionalOnMissingBean 注解, 用户手动注入, 则默认的该设置则失效
     *
     * @return
     */
    @Bean
    @ConditionalOnMissingBean
    public HelloService helloService() {
        return new HelloService(
                helloServiceProperties.getUsername(),
                helloServiceProperties.getPassword());
    }
}
HelloServiceProperties 配置文件读取类
import lombok.Data;
import org.springframework.boot.context.properties.ConfigurationProperties;

@ConfigurationProperties(prefix = "hello")
@Data
public class HelloServiceProperties {
    private String username;
    private String password;
}
application.yml 配置文件
配置文件对于 hello-spring-boot-starter 项目而言不是必须的,因为 hello-spring-boot-starter 项目本身并不执行,项目的配置文件是一种设置默认值的体现。
hello:
  username: root
  password: root
spring.factories 自动配置类的地址指示文件
# 告诉使用hello-spring-boot-starter的SpringBoot项目去哪里加载 HelloService 的自动配置类
org.springframework.boot.autoconfigure.EnableAutoConfiguration=com.example.config.HelloServiceAutoConfiguration
自定义 spring-boot-starter 进阶(AOP编程)
两个关键点:
- 自定义注解 + 拦截器(拦截器体现的是 AOP 编程)
- 在配置类中注入拦截器的方式(和一般的 Bean 对象不同)
在上面 hello-spring-boot-starter 的基础上,进一步拓展
自定义注解
import java.lang.annotation.ElementType;
import java.lang.annotation.Retention;
import java.lang.annotation.RetentionPolicy;
import java.lang.annotation.Target;

/**
 * 自定义注解
 */
@Target(ElementType.METHOD)
@Retention(RetentionPolicy.RUNTIME)
public @interface MyLog {
    /**
     * 方法描述
     *
     * @return
     */
    String desc() default "";
}
自定义拦截器(即AOP编程,对所有标注
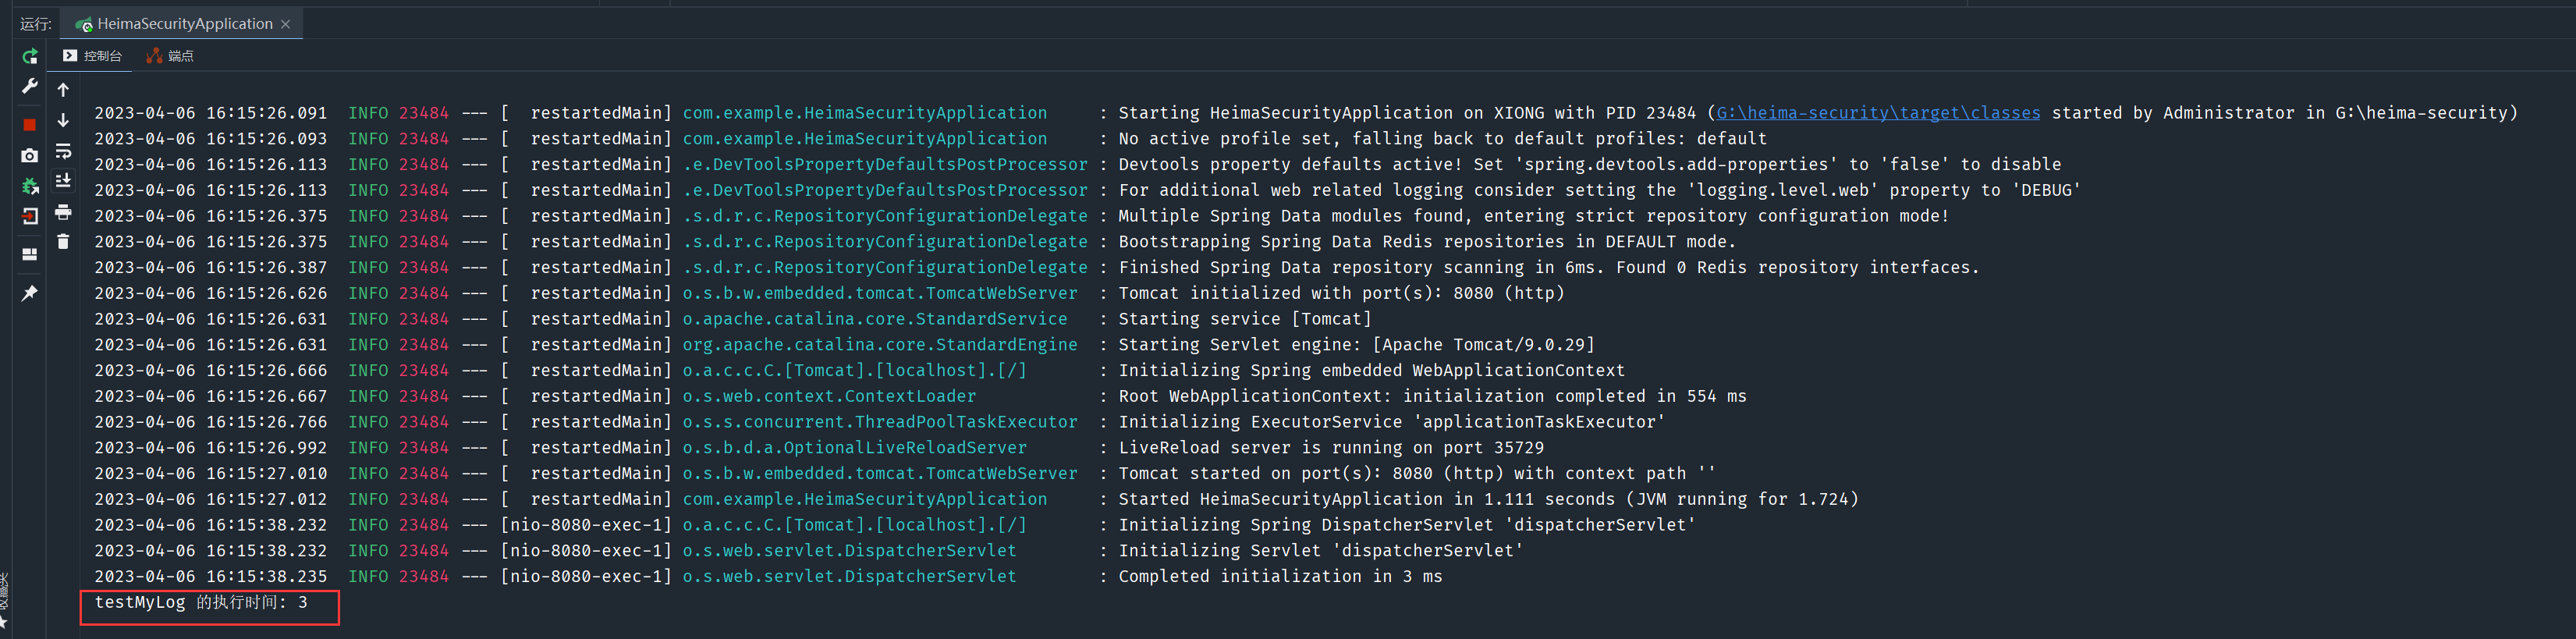
@MyLog注解的原始方法进行增强)这里决定了
@MyLog的生效范围是 web 中的 controller 方法?为什么在@SpringBootTest中进行测试无法正常输出信息import org.springframework.web.method.HandlerMethod; import org.springframework.web.servlet.ModelAndView; import org.springframework.web.servlet.handler.HandlerInterceptorAdapter; import javax.servlet.http.HttpServletRequest; import javax.servlet.http.HttpServletResponse; import java.lang.reflect.Method; public class MyLogInterceptor extends HandlerInterceptorAdapter { private static final ThreadLocal<Long> startTimeThreadLocal = new ThreadLocal<>(); /** * 原始方法之前执行 * * @param request * @param response * @param handler * @return * @throws Exception */ @Override public boolean preHandle(HttpServletRequest request, HttpServletResponse response, Object handler) throws Exception { HandlerMethod handlerMethod = (HandlerMethod) handler; Method method = handlerMethod.getMethod(); MyLog annotation = method.getAnnotation(MyLog.class); if (annotation != null) { // 说明当前拦截的方法上添加了自定义的 @MyLog 注解 // 1. 用 ThreadLocal 来记录该方法的开始执行时间 // TODO 为什么要使用 ThreadLocal 呢? startTimeThreadLocal.set(System.currentTimeMillis()); } // 该拦截器为添加 @MyLog 注解的方法进行功能增强, 而不是真正意义上的拦截某个请求, 因此所有方法都会放行(返回true) return true; } /** * 原始方法之后执行 * * @param request * @param response * @param handler * @param modelAndView * @throws Exception */ @Override public void postHandle(HttpServletRequest request, HttpServletResponse response, Object handler, ModelAndView modelAndView) throws Exception { HandlerMethod handlerMethod = (HandlerMethod) handler; Method method = handlerMethod.getMethod(); MyLog annotation = method.getAnnotation(MyLog.class); if (annotation != null) { // 自定义一些日志的输出信息 System.out.println(method.getName() + " 的执行时间: " + (System.currentTimeMillis() - startTimeThreadLocal.get())); } super.postHandle(request, response, handler, modelAndView); } }MyLogAutoConfiguration 配置类中注入拦截器的 Bean 对象(和一般的 Bean 对象有所不同)
import com.example.mylog.MyLogInterceptor;
import org.springframework.context.annotation.Configuration;
import org.springframework.web.servlet.config.annotation.InterceptorRegistry;
import org.springframework.web.servlet.config.annotation.WebMvcConfigurer;

/**
 * 创建 web 层相关的配置类需要实现 WebMvcConfigurer
 */
@Configuration
public class MyLogAutoConfiguration implements WebMvcConfigurer {
    /**
     * 对于拦截器对象(AOP编程)的专门处理, 不使用@Bean注入, 而是使用registry.addInterceptor()的方式进行添加
     *
     * @param registry
     */
    @Override
    public void addInterceptors(InterceptorRegistry registry) {
        registry.addInterceptor(new MyLogInterceptor());
    }
}
在 spring.factories 文件中设置配置类的全类名(多个配置类之间使用逗号
,进行分隔,换行需要添加\)org.springframework.boot.autoconfigure.EnableAutoConfiguration=\ com.example.config.HelloServiceAutoConfiguration,\ com.example.config.MyLogAutoConfiguration通过 controller 来进行测试(必须通过 controller 层)
import com.example.mylog.MyLog;
import com.example.service.HelloService;
import org.springframework.beans.factory.annotation.Autowired;
import org.springframework.web.bind.annotation.GetMapping;
import org.springframework.web.bind.annotation.RequestMapping;
import org.springframework.web.bind.annotation.RestController;

@RestController
@RequestMapping("/hello")
public class HelloSpringBootStarterController {
    @Autowired
    private HelloService helloService;

    @GetMapping("test")
    public String testHello() {
        return helloService.toString();
    }

    @GetMapping("mylog")
    @MyLog
    public String testMyLog() {
        return helloService.toString();
    }
}
测试结果